

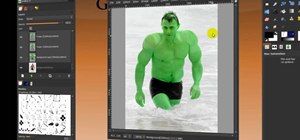
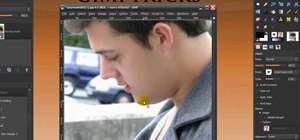
First of all open the image of Daniel Craig. Go to 'layer' and create a 'duplicate' the current layer. Then from top choose 'colors' then 'saturation'. Now click the 'r' from right side bar and also adjust up the 'hue' to 108 till he looks green. Now adjust the 'saturation' bar till 100 and then click 'ok'. Now go to 'filters' at top bar and then click 'distort' and then 'iwrap' filter. This shall open a new screen. Drag the image large. Now click 'move' and then 'deform radius'. This shall make his forehead looking bigger. Now click 'grow' and select 30 and make his both his shoulders, chest, under arms, hands, body and biceps bigger. Now click 'animate' and fill in 25 frames and click 'ok'. Wait till all the 25 frames are created. Then go to 'filter', then 'animate' and then 'optimization for gif'. This shall create a new window in sometime. From the left hand bar click on the Daniel Craig original photo and double click it and change its time to 500ms. Now click 'filter, then 'animation' and then click on 'play'. A new screen opens up and then you have to click 'play' to view it. Now save it as 'gif' file. Now a new screen opens up. Click 'export', then 'save as animation' and export. That's it.
Just updated your iPhone? You'll find new emoji, enhanced security, podcast transcripts, Apple Cash virtual numbers, and other useful features. There are even new additions hidden within Safari. Find out what's new and changed on your iPhone with the iOS 17.4 update.


Be the First to Comment
Share Your Thoughts