


Hello everyone,
This is my first tutorial posted on WonderHowTo and as a starter I wanted to show you how to make a nice curtain in GIMP, the free Photoshop alternative. Even though GIMP does not have all the features of his expensive brother, you can still do some cool designs or photo manipulation.
So let's start creating our digital curtain.
Start with a blank, 800 x 600 px, design
Start with a blank design. Select the Blend Tool (L key) and choose the FG to BG (HSV counter clockwise) gradient fill. I picked for the foreground color a dark blue (#081d47) and for background some red (#e01717). Then fill the background layer with the previously selected gradient. We'll have something like in Picture 1.
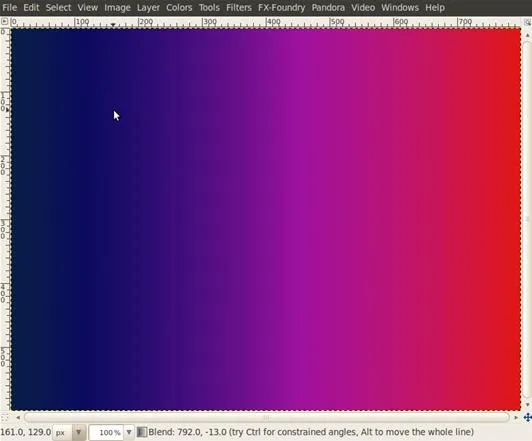
Picture 1
Create a new layer and name it "plasma"
Create a new layer and name it plasma.
Go to Filters menu -> Render -> Clouds -> Plasma. Leave the default settings and click OK.

Desaturate the "plasma" layer
Go to the Colors menu -> Desaturate and in the next Dialog window pick Luminosity.

Create a new layer and name it "drape"
Go to Filters menu -> Render -> Pattern -> Sinus and fill the sinus parameters as in the following pictures.


We'll have something like this on the "drape" layer:

Apply lens distortion on "drape" layer
In order to create a realistic curtain we'll apply a lens distortion effect on the "drape" layer. Go to Filters menu -> Distorts -> Lens distortion and set the parameters as in the next photo.

The image will look like this:

Change the layers display modes
Now change the mode of the "drape" layer to Multiply and the mode for "plasma" layer to Grain merge

We're almost done. We have until now this picture:

Add some neon glow text on it
Let's make it more appealing by adding some neon glow text to it. Choose the text tool and select a nice slim font of your choice. I've selected "MgOpen Cosmetica".
Now write some text as in the next picture and color it with a light blue (#d4e1fb).

Now, duplicate the text layer 3 times.

Right click in the layer toolbox on the 3rd duplicated text layer and select Layer to image size.
Repeat this step for the other two duplicates.
On the 3rd duplicated text layer apply a Gaussian Blur filter with the radius of 30.
On the 2nd one a blur radius of 20 and on the 1st duplicate a blur radius of 10.
Change the text color on the original text layer to white, and we're done.
Here is the final image:

Hope you like it. Have fun.


Comments
Be the first, drop a comment!